Is browsing speed important to you?—well of course it is. Who wouldn’t want a fast and tension free browsing experience. Google Chrome is the most widely used browser in the world for some past years now. Chrome is known for its super-fast browsing experience that it offers with respect to its competition. But have you noticed that your Google Chrome browser is acting slow lately and even crashing on occasions. Most of the times it is the unnecessary extensions or plugins and even the browsing data can really slow down Chrome. Good news for you is that worry not, this article will teach you how to modify your Chrome in order to achieve the best possible fast browsing experience.
Accessing Chrome Flag Features
To access some of the modifications that will be discussed below, you would have to use Chrome’s unofficial browser feature called ‘flags’. Do remember, these features are sternly experimental and may cause your browser to stop working, so don’t experiment on your own and just follow what is discussed below to know how to speed up your browser.
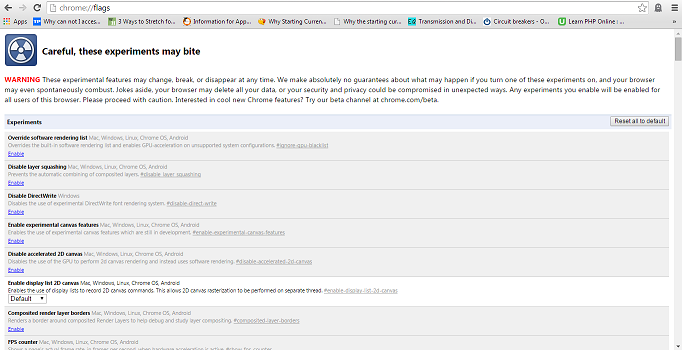
To access chrome flags, simply enter chrome://flags into your address bar as shown in pic below and press enter.
Fix the number of “Maximum Tiles” to 512
The feature we are going to change first of all is “maximum tiles”. Everything has fixed resources. You see the Ram given to the browser is fixed to 128MB and what this feature is actually doing is increasing the amount of RAM available to Chrome. This should take care of glitches.
Note: If you have a system with RAM less than 2GB, then this tip is not advised.
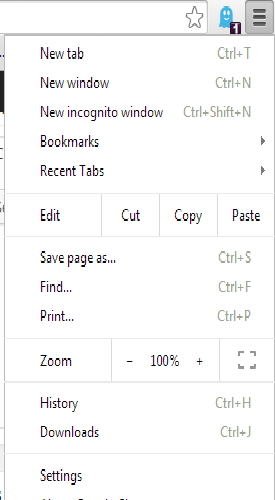
To make the change, access chrome flags as discussed above. Now open the find box by pressing Ctrl+F in Windows or using the three horizontal lines like button after address bar to open a drop down menu like shown below. In Find, type Maximum Tiles and press enter. You are directed to the Maximum Tiles row, now open the drop down menu and set Default to 512.

Disable Extensions
Extensions are small utilities available for adding extra functionality and features to your Chrome browser. These extensions are available in Chrome’s Web Store. These extensions can be really helpful, but installing a lot of these can affect your browser’s speed adversely. Disabling these extensions should earn you some speed on your slow browser
You will notice that some of these extensions have installed a button after the address. These can quickly be removed by right clicking on them and selecting uninstall.
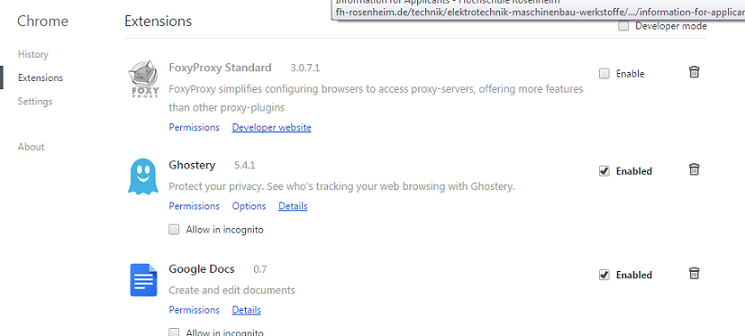
You might like: Top 10 Google Chrome Extensions Which You may Love to use with Your LaptopThe rest of the installed apps and extensions can be removed by going to extension settings. You can Start by clicking on the three horizontal lines like icon discussed above and from the drop down menu, go to Tools > Extensions.

Now all of your installed extension are listed and you can uninstall them by pressing the dustbin icon.

Some of these extensions might only be disabled, so uncheck the enabled box on the right of extension’s title.
Turn on Offline Cache Mode
This trick can be used for those moments where briefly interrupted internet connectivity can slow down your browser, so you can enable Chrome to load cached versions of webpages. Go to chrome flags and then find ‘Enable Offline Cache Mode’ using find tool discussed above. Now click Enable in the Offline Cache Mode row.
Turn on Fast Tab/Window Close
Are you finding the closing of a tab or Window not fast enough on your browser? In that case enable the Fast Tab flag. What this does is to Chrome’s JavsaScript handler independent of the graphical user interface (GUI), thus making the content disappear even faster. Go to chrome flags and find ‘Enable Fast Tab’. Now click on Enable.
Clear up the Browsing Data
As you are care-free browsing on the web, what is happening is that the Chrome’s history database keeps on collecting URLs and cached texts for your visited websites, also your download history, plugin data, cookies etc. The basic point of keeping the history and other website data cached on your computer is to save time and bandwidth as you won’t have to download this data every time. The problem occurs when the history database becomes too large and starts slowing down Chrome.
Do not that that there is no need to regularly keep on clearing browsing data as it defeats the whole purpose of local cache system in the first place.
To clear your browsing cache just follow the steps mentioned.
- Go to the horizontal lines button mentioned above. In the drop down menu go to settings. Now on the left you can see three options one of which is History. Click on it.
- You history is displayed now. Above is a button of clearing browser data.
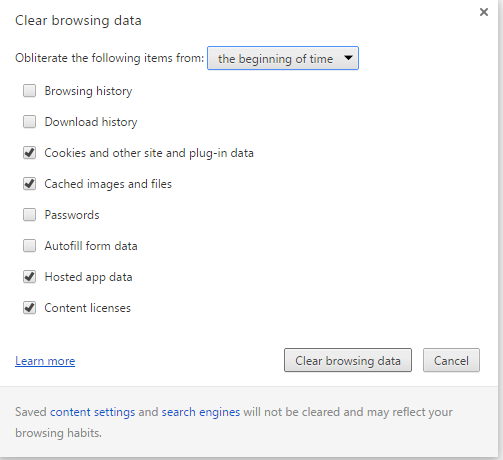
- Clicking on it open a pop up box with different options. There is an option to obliterate items starting from different time periods given with last one clearing everything since browser installation.

There are also options to clear what you want like browser history, download history, cache etc. Check all the options you want cleared (especially cache for purpose of increasing browser speed) and then just click clear browsing data.
Hopefully, these tips on how to speed up your chrome browser would be enough.


