Enabling or creating Wi-Fi hotspot in window 8 is really a hard option if you are a gui user and find it hard to play with the core windows options. In windows seven there was an option to create the Wi-Fi hotspot but it’s not the case with the Windows 8. In Windows 8 you will need cmd to create a hotspot. Later you will share your laptop internet connection with the hotspot through the windows Network and sharing center. This article aims to give you the most easiest way of sharing your laptop’s internet connection using the wifi hotspot, after reading thea article you’ll learn how to create a wifi hotspot in windows 8 using command prompt. (Note: If you are on Windows 10 then follow this guide instead: Make Wi-Fi Hotspot in Windows 10)

How to Create Wi-Fi Hotspot in Windows 8 & Windows 8.1 – Step by Step Guide:
Below is the step by step guide to create and share your laptop internet connection with other wifi devices using windows 8 wifi hotspot.
Things which You Will need to share your internet with other Wi-Fi Devices:
- A Working Internet Connection (Either Dial Up Connection or Else Lan Internet Connection)
- A Built In or External Wifi adapter which supports the sharing ability for internet connection
- A laptop surely and a brain to learn how to create wifi hotspot in windows 8
Finding out: that whether your Wi-Fi card supports sharing:
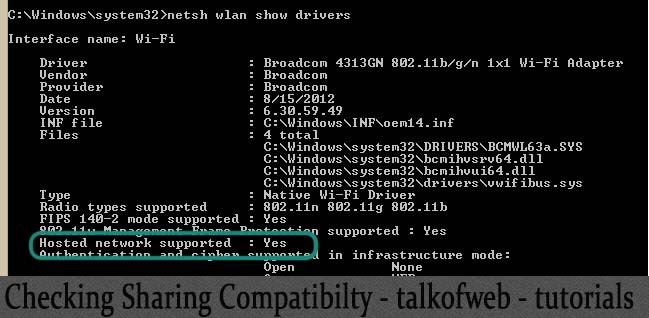
Let’s find out that whether your wifi card supports sharing or not for this go to search and open up CMD in the administrator mod. For opening CMD in administrator mode you need to right click it the icon of command prompt and then open the cmd in “Administrator Mode“. After you have opened cmd write the following command and look for the thing mentioned in the screen shot that whether it’s written yes or no. It it’s yes then you can go on “It means that you can enable the hotspot and can share your internet connection.” Command to Check Sharing Compatibility of wifi network for windows 8:
netsh wlan show drivers

Now find the following , hope so that you will find a yes! Basically you just need to check that that whether a hosted network is supported by your adapter or not, if hosted network is supported then you can create a wifi hotspot to share the internet connection of your laptop, basically your laptop will act like a wifi router.
Creating The Wi-Fi Hotspot:
Don’t close the cmd as you are going to use cmd again. Following is the command line to create the hotspot, set the password and name it as you want too.
netsh wlan set hostednetwork mode=allow ssid=nameOfwifiHotspot key=yourpassword

The above is the command to create the hotspot. Replace “nameOfwifiHotspot” with the desired network name and replace “yourpassword” with the desired password which will be used by the others to connect to the hotspot. Press the enter and hotspot will be created. Now you just need to start the hotspot in order to start sharing your internet connection.
Starting the Wi-Fi Created Hotspot in Windows 8:
Now you need to start the wifi hotspot in windows, again you are going to need the cmd and the cmd must run in the administrator mode. Write the following command in the cmd to start the above created hotspot.
netsh wlan start hostednetwork

Press enter and the hotspot will be created and will be discoverable by the other devices as well. Just turn on wifi of other devices and I am sure that now, the other devices will be able to receive wifi signals from your laptop, this means you have successfully started a wifi hotspot in windows 8.
Sharing the working internet connection with the windows 8 Wi-Fi hotspot:
All Right, everything has been done and now you only need to give your laptop’s internet connection’s access to the created hotspot, so that any user connected to the hotspot will have the internet access also. For this reason you will need to open the windows networking and sharing center.


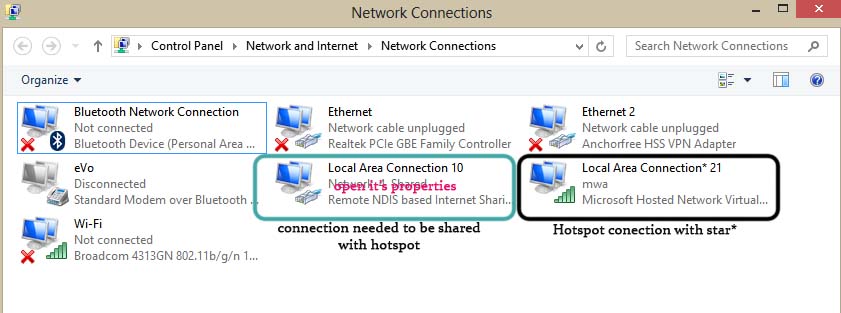
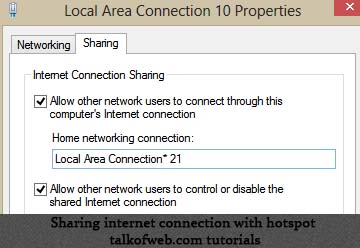
Open up the network and sharing center, and then go to “Change adapter settings” on the top left pane. Click that to open. Here you will see your created hotspot connection plus the connection which you want to be shared with the hotspot for the internet sharing. The created hotspot connection has the star with the name (It actually shows the virtual adapter which spread wifi signals from your laptop to other devices, you need to give this virtual adpater the internet access). You need to open the properties of the connection which you want to be shared with the hotspot. Right click and open the properties of the connection which has the internet access and is the original internet connection of the laptop, whether it’s a dialup, local area network or anything like that. Go to the sharing tab in the properties and then tick the “Allow other network users to connect through this pc internet connection” and in the drop down below, select the hotspot connection which is “Local Area connection *21” in my case and then hit ok. Re-dial the connection or else reconnect the internet connection if needed. That was it and you are done and this is how to create wifi hotspot in windows 8, even it works with windows 7, the password to connect with the hotspot is the same which you used while setting up hotspot in the cmd. If you can’t still share the internet then reason are that firewall or an antivirus is causing the problem, try disabling the firewall if you trust the person with whom you are sharing the hotspot or else try adding an exception int he firewall or antivirus.
Update: Resolve your wifi hotspot errors like “The hosted network could not be started”:
After receiving a lot of error reporting in the below comments of this post, I have written an article on how can you resolve errors which retain your from creating a successfull internet connection shared wifi hotspot on windows 8 or windows 7, read detailed guide: Resolve wifi hotspot errors or any other error which may happen while creating the hotspot
Update: Learn how to start Wifi Hotspot in Windows 8, everytime you restart your laptop:
A lot of users have asked this question in comments, about starting the hotspot once the laptop is turned off and turned on again, so here is this guide: Relaunch Windows 8 Wifi Hotspot on Each Restart Without Creating a New One! Using the above guide it will not be required by you to create wifi hotspot in windows 8 every time you start your laptop, instead you can use a set of commands which can be saved in a file to start the wifi hotspot in windows 8, those set of commands can be automatically executed once you run the file.
Update: Learn how to create Wi-Fi hotspot in Windows 10
Microsoft has just released windows 10 and if you again don’t know how to create a Wi-Fi hotspot in Windows 10 then read this article below and find a step by step guide: Learn how to Create Wi-Fi hotspot in Windows 10 and share your laptop’s internet connection with Wi-Fi enabled devices
Update: Softwares which can be used to create Wi-Fi Hotspot
You can also use softwares to create wifi hotspot. Find out some amazing free softwares to create Wi-Fi hotspot. These softwares allow an easy interface and you don’t need to use command line in order to create hotspot in Windows.
Update: Troubleshoot WiFi not working / WiFi hotspot errors in Windows 10
We’ve written a comprehensive guide which explains how a person can solve the WiFi hotspot errors in Windows 10. The guide explains 6 steps which someone can take to solve his hotspot errors and finally connect WiFi enabled device to the internet.
Update Made on: 10 June 2020


Thanks a lot for the tutorial..worked like a charm to me !!!!
When i enter the command netsh wlan start hostednetwork it says hosted network cannot be started
Group or resource is not in the correct state to perform requested operation
itz working like a charm,thanx a ton 🙂
i made my computer hotspot but i want to turn it off!!!
can you help me???
I have done all thing but net is not working with other devices