The number one solution to transfer files between a Mac and Windows PC is USB. In order to accomplish the above-mentioned, plug-in the USB to your Macbook’s port, copy required data and paste it to the Windows PC. Just imagine if you could do the same procedure without using a USB. Yes, you got it right. You can easily transfer files from Mac to PC without using a USB. We can use a simple Wi-Fi router in order to transfer our files between two different platforms.
Enabling Windows PC to share files over Wi-Fi
The first step is to let Windows PC share files over Wi-Fi network. Make sure you have connected your Windows PC to the same network/router. You can either use a LAN cable to connect your PC to the Wi-Fi router, or you can use a Wi-Fi stick.

Once your PC is connected to the router, you need to enable file sharing. Follow these steps:
- Go to Control Panel > Network and Internet > Network and Sharing Center.
- You need to make sure that you have designated your current Internet connection as Private. In order to do so, click Advanced sharing settings in the left bar.
- Tick Turn on network discovery, Turn on automatic setup of network connected device.
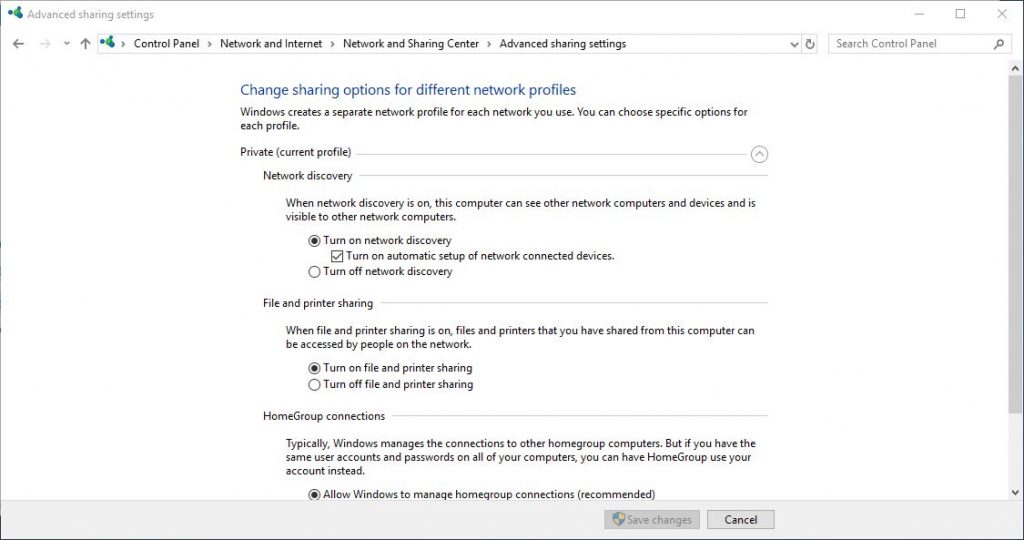
Navigate back and make sure that your network is shown as Private Network. If you’ll go to My Computer you’ll notice Network icon in the left bar. Click that, it’ll prompt you to designate the network as Private in order to see connected devices. Furthermore, when you connect your computer to internet, it always asks whether it’s a public network or private.
Share a Specific Folder to Network:
As you have turned on network discovery, now any device connected to the same internet/Wi-Fi router can view your PC. The already shared folders are now visible. If your Windows PC is not password protected, then any device connected to your network can view those publicly shared folders. In case of windows, if you go to C://Users/Public, then these are already shared folders. Let’s share another folder:
- Go to the folder which you want to share.
- Right-click and open Properties. Click Sharing > Share.
- Add a user from the drop-down menu to which you want to give Read/Write permissions. (The same password-protected user will be used to access this folder from Mac)
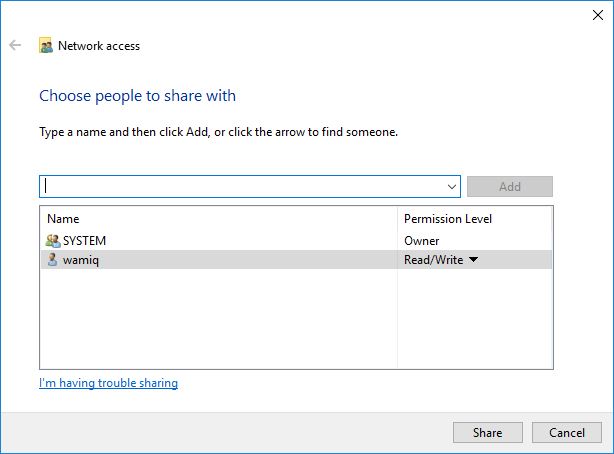
In the above example, the concerned folder is shared to the user System and an additional user account with Read/Write permission. We will use same account to access the concerned folder from Mac.
Access Windows PC shared folder through Macbook:
Let’s learn how to access our Windows PC shared folder through Mac. Make sure that you’ve connected your Mac to the same Network. You can use Wi-Fi for this purpose. Follow the procedure to access the shared folder:
- Open Finder and click Network in the left-pane.
- Again click Network > Click your PC and click Connect As.
- A prompt will appear asking you to enter username and password. (Use same username to which you shared your folder and enter the user account password which you use to login to your Windows PC.)
Once you’ll connect to your PC, you’ll be able to browse the shared folder. Furthermore, you’ll also notice the mounted folder in the Network folder of your Mac.
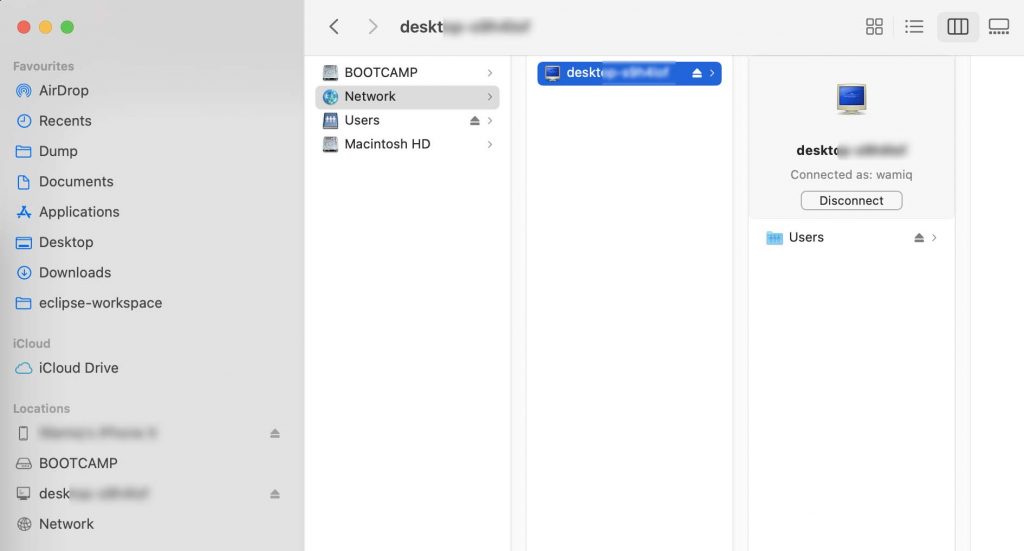
Since you’ve given Read/Write permission to the user, now you can not only copy files between Windows and Mac, but also paste files inside your Windows PC directly through Mac.
Conclusion:
In order to transfer files from Mac to PC, you don’t need a USB drive. You can also do it through a Wi-Fi router. Furthermore, it allows you much better flexibility as compared to a USB device. However, your router must have a good transfer rate over LAN and Wi-Fi. Normally LAN transfer rate is huge, whereas some routers don’t provide better Wi-Fi transfer rate. Many base version routers provide 150mbps which translates to 17.88 MB/second, it’s good enough.


